Introduction
Hey Anylearners! Your spreadsheet may require some lists or even tables that require inserting some checkmarks. For many, this can be a hassle, considering the variety of options in the Excel ribbon. Here’s a guide on how you can insert an Excel checkmark symbol for your spreadsheet.
This guide will cover the several possible easy-to-follow methods of inserting a checkmark symbol. It will cover a basic introduction to the difference between a checkbox and a checkmark symbol in Excel, as well.
Checkmark Symbol VS Checkbox
The Checkmark Symbol and the Checkbox are two very commonly mixed-up terms in Excel. They serve different purposes and have completely different methods of inserting.
Checkmark symbol
A checkmark symbol, also known as a tick symbol, has a special purpose for use that does not overlap with the checkbox. It is usually inserted into a single cell, where it is used to indicate the “correctness” of a field. Typically placed next to a field for checking its “correctness”, this symbol is used together with a cross symbol to indicate that a field is “wrong”.
For instance, this symbol can be used for showing if a question was done right or wrong.
In this screenshot example shown below, I have created a simple dataset of a table showing questions in a quiz and their respective results. The result of the 3 questions is being inserted into a column beside the questions of each row. In this table, the checkmark symbols were used to indicate a correct result and the cross mark symbol was used to indicate a wrong result.

Checkbox
A checkbox is Excel is inserted into a table to indicate the presence or absence of an item. This is commonly used in checklists that track inventory. Checkboxes allow interactivity, where a user can click on a checkbox to toggle between showing a tick in the checkbox and an absense of a tick in the checkbox.
In this article, we will not be covering the ways to insert a checkbox but a checkmark symbol instead. Now with all that explanation and we are all clarified, let’s start with the 5 ways to insert an Excel checkmark symbol.
How to Insert an Excel Checkmark Symbol
1. Insert directly using the Symbols options menu
Firstly, the most straightforward way to insert the symbol is none other than using the Symbols options. Here’s the instructions how:
Total Time: 5 minutes
Select cell to insert symbol with
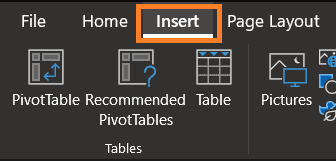
Select the Insert tab on the Excel ribbon
This is usually at the upper-left corner of your Excel interface
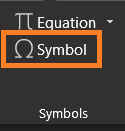
Select the Symbols option under the Symbols section
This can be found on the ribbon. A dialogue box should popup,
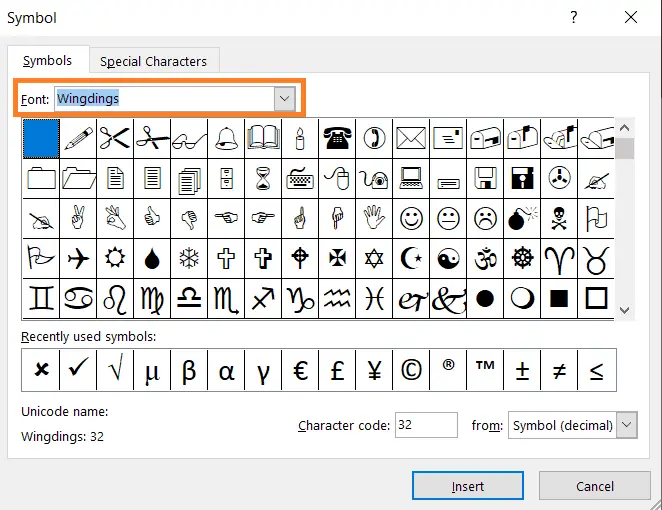
Click the dropdown arrow at the Font options and select Wingdings as your font
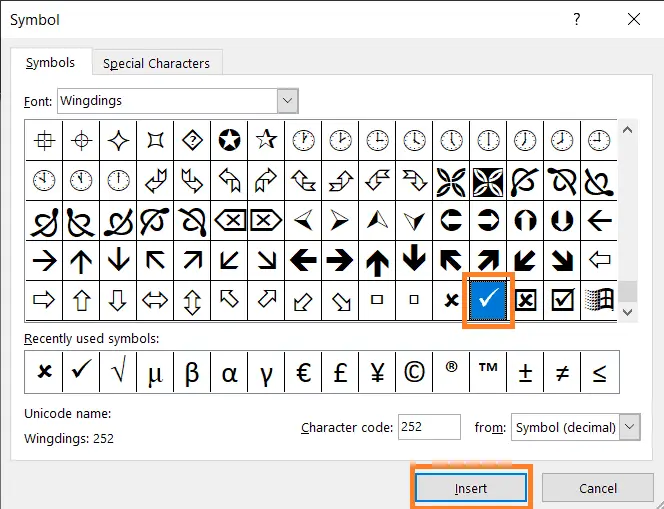
Scroll down all the way, select the checkmark symbol and click Insert
Click on Cancel to close the dialogue box
There you have it, a simple and direct way for a checkmark symbol to be inserted into a cell. In case you haven’t noticed, a cross symbol is also available from the Wingdings symbol collection. There are other variations of checkmarks that you can choose from, which are beside the symbol that was chosen in this example.
2. Insert using dropdowns using data validation
Our first example was really direct and simple but if you’re up to trying something more advanced, this method might be useful for you. By using the data validation features in-built in Excel, we can create simple dropdowns in your cell to insert the checkmark symbol. This method allows for quicker inserting of multiple symbols across a column. It requires a pre-existing copy of the checkmark symbol.
Here’s how:
1. Insert a checkmark symbol into the first cell of your column

2. Select the Data and under the Data Tools, click on Data Validation

3. Select List in the Allow options dropdown in the Validation Criteria section
4. Select the cell reference with the symbol in the Source field and click OK
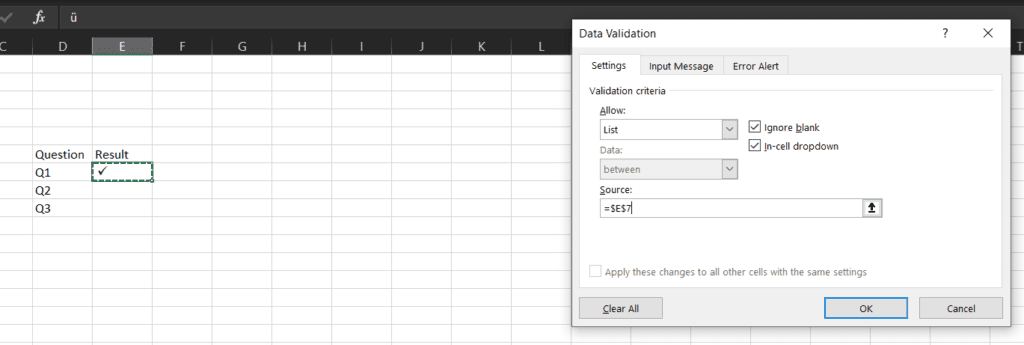
You can add more symbols to this field, just separate them by commas. A great example would be to add a cross symbol to complement the checkmarks.
3. Insert using character codes
In addition, to the previous methods, we can make use of the character codes of the checkmark in the Wingdings font for inserting the symbol. Character codes in Excel help to reference certain characters.
1. Select cell to insert symbol with
2. Select the Home tab and at the Font section, change your font to Wingdings
3. Press and hold ALT + 0252 to insert the checkmark symbol
4. Insert using keyboard shortcuts
Apart from the complicated and advanced method of using data validation, we can also insert special characters and symbols using the keyboard shortcuts Here’s a really simple and quick hack to inserting without much navigating in the Excel ribbon.
1. Select cell to insert symbol with
2. Select the Home tab and at the Font section, change your font to Wingdings 2
3. Press the shortcut keys Shift + P
The Shift + P key is a shortcut to creating the checkmark symbol in the Wingdings 2 font. This Is just one of the symbols that can be created using this font. Other variations of the checkmark symbol can be added as well.
5. Insert using the CHAR function
The CHAR function uses a symbol’s code to give the respective symbol. This is rather unecessary for inserting symbols but it does work well, if using formulas is more of your thing. Just like every function in Excel, this function requires user input of the character symbol code. Depending on the required symbol, you can choose the appropriate symbol code.
Here’s an example of the CHAR function
=CHAR(252)
And here’s how you can use it:
1. 1. Select cell to insert symbol with
2. Type =CHAR(code_number) into the formula bar
The code_number input can be of any of the following numbers for different variations of checkmark symbols:
- 252 (tick alone)
- 254 (tick in box)
3. Select the Home tab and at the Font section, change your font to Wingdings
Once you insert the checkmarks, you might want to remove the underlying formula from the formula bar. In this case, you can simple copy the cell or range into your clipboard (I use the Ctrl +C shortcut) and paste values only. That should leave just the symbols in the cells.
A great advantage of this method is that you can copy formulas into other cells, giving them the same output. This can be useful if you need to replicate more of such symbols.
Conclusion
To end things off, learning to use Excel checkmark symbols is a great addition to your expanding skillset in Excel and these tips can really set you up to be a power user in Excel! Having seen these multiple methods, I’m positive that you feel that some are just too simple to be true.
With these 5 must-know ways to insert them, I’m sure that you’ve learnt something and picked out 1 that’s the easiest to implement for yourself. I have personally tried these myself and have found them effective, although some more than others. Do try these methods out for yourself and let me know how it goes.
If you are hungry for more resources and tutorials on Excel, you can access my Excel archives through this link here: Excel Archives. Thanks for reading!
My Favorite Learning Resources:
My Recommended Learning Platforms!
| Learning Platform | What’s Good About the Platform? | |
|---|---|---|
| 1 | Coursera | Certificates are offered by popular learning institutes and companies like Google & IBM |
| 2 | DataCamp | Comes with an integrated coding platform, great for beginners! |
| 3 | Pluralsight | Strong focus on data skills, taught by industry experts |
| 4 | Stratascratch | Learn faster by doing real interview coding practices for data science |
| 5 | Udacity | High-quality, comprehensive courses |
My Recommended Online Courses + Books!
| Topic | Online Courses | Books | |
|---|---|---|---|
| 1 | Data Analytics | Google Data Analytics Professional Certificate | – |
| 2 | Data Science | IBM Data Science Professional Certificate | – |
| 3 | Excel | Excel Skills for Business Specialization | – |
| 4 | Python | Python for Everybody Specialization | Python for Data Analysis |
| 5 | SQL | Introduction to SQL | SQL: The Ultimate Beginners Guide: Learn SQL Today |
| 6 | Tableau | Data Visualization with Tableau | Practical Tableau |
| 7 | Power BI | Getting Started with Power BI Desktop | Beginning Microsoft Power BI |
| 8 | R Programming | Data Science: Foundations using R Specialization | Learning R |
| 9 | Data Visualization | – | Big Book of Dashboards |

